Working
Techniques and Repair Methods for Plaster Decorations on Facades
By: Søren Vadstrup
4. Decorated
flat plaster on facades
Variations - surfaces and decorations
Flat plaster surfaces on facades
is seldom just flat plaster. The deliberate choice of gravel and sand for
the mortar influences on the colour and texture of the finished plaster.
This "natural coloured" plaster can be brown, grey, brown-grey, brownish,
yellowish, reddish - as the gravel materials itself.
The next decorating step is to colour
the mortar with pigments. This enable the plaster to be yellow, red, red-brown,
green, black-grey and white.
The third step is to give the plaster
a surface treatment of colours, made by paint or lime wash all over the
surface. But this materials can also manifest itself in artistic decorations
in lime technique (al secco) or in linseed oil technique.
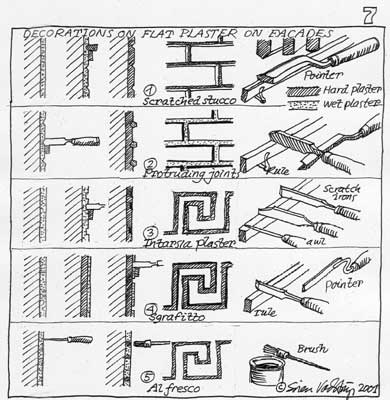
More sophisticated decorations can
however achieved by decorating the flat /plaster itself, by 5 various techniques:
1 Scratched stucco-decoration
2 Protruding pointings
3 Inlay/intarsia plaster decorations
4 Sgrafitto decorations
5 Al fresco decorations
Materials
The materials for these techniques
are mainly wet slaked air lime mortar (air lime and gravel 1:3) or hydraulic
mortar (air lime, hydraulic lime and gravel 1:1:6). Portland cement mortar
will tend be a too hard and stiff material for this purpose.
To obtain and ensure a sufficient
flexible and workable mortar, the wet slaked lime has to be matured for
at least 3 years in a frost free lime kiln, very fine grained and without
any sort of dirt or impurity.
Also the gravel and sand has to
be carefully selected, sieved, washed and without any impurities.
Even the water must be very clean
and without any salts etc. Best is distilled water, so in previous times,
the masons gathered rainwater in special wooden barrels. The same is recommended
to day. Air lime mortar, made with use of rain water, carbonate even more
slowly than else, and could therefore be worked in with sgrafitto, intarsia
and alfresco for a longer period.
Making flat plaster
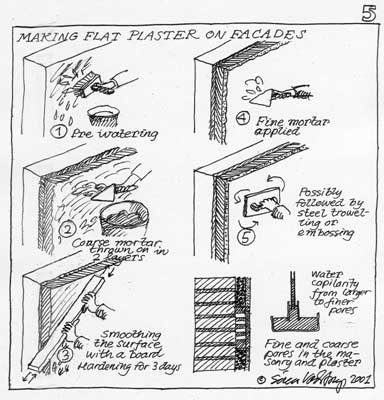
Flat plaster has to be made in three
coatings or layers as shown on drawing no. 5:
1 A thin, rough backing coat of
hydraulic lime-mortar with quite coarse sand, thrown on the masonry, keeping
a fairly rough surface. This layer should harden 2-3 days.
2 A 2-3 cm thick second coat of
coarse mortar, drawn to an even layer and after that allowed to harden
for one week.
3 A 1 cm thick finishing layer with
fine grained sand, thrown on and scoured to an even coating.
As water inevitable moves from larger
pores to smaller, a construction with fine pores on larger pores, this
construction ensures, that intruding water will move out again relatively
fast.
Tools and utensils
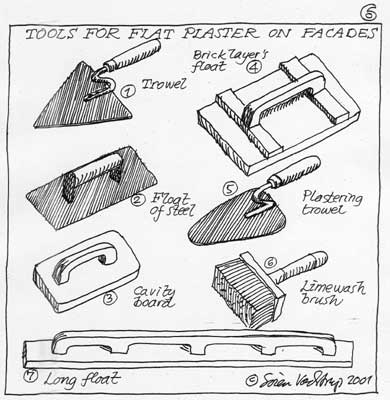
The tools and utensils for the flat
plaster are shown on drawing no. 6 and for the flat plaster decorations
on drawing no. 7. The latter are various scraping irons, special spoons
and awls etc. It is important to be very choosey and specialized in selecting
the tools - not just to chose the first and the best.
To the utensils belong various fillets,
a drawing, impregnated with shell-lacquer, and provided with a lot of holes
along the lines of the figures. A so called ponse, which is used for transferring
the drawing to the plaster-ground.
Making scratched stucco-decorations
Scratched stucco pointing, also called
"the poor mans ashlars" is made in the still wet third layer - after the
scouring of the surface. The geometry of the decoration is drawn with an
awl with "light hand". Resting on a wooden list or lath, held by one hand,
a special mason's drag forms a sharp "pointing" imprint in the wet mortar.
The pointing is usually a V-shape, but can also have a square cross section.
Making protruding pointings
Protruding pointings are also made
in the still wet third layer of a flat plaster coat. Here the geometry
figures are scratched with a special iron, held perpendiculary to the surface
and making a slight uneven V-trace, 2-3 millimetres deep.
After hardening for a week of the
plaster, the protruding joints are added in hydraulic lime mortar (1:2:9)
with a special shaped pointing-iron/jointer. The tool is mainly drawn by
hand, resting on a horizontal wooden float, where a pile of mortar is placed.
The consistency of the mortar has to be very precise, both to achieve straight,
precise and sharp-angled pointing and to avoid stains or patches from the
mortar on the rest of the plaster surfaces.
Making inlay/intarsia plaster
decorations
Inlay/intarsia plaster decorations
are also made in the still wet third layer of a flat plaster coat. The
name means "inlay" in Italian, and in this technique specially coloured
mortar is inlayed, in scratched grooves in the fresh mortar.
The decoration is drawn on the surface
in free hand with an awl or the decoration is transferred to the surface
from a drawing via a ponse - a shell lacquer impregnated cardboard, provided
with a lot of awl holes along the outlines of the drawing. With a little
un-tight linen bag (ponse bag), filled with charcoal-dust, the black powder
is sprinkled over the ponse to mark the outline of the decoration at the
wall through the pricked holes in the paper.
Another method to transfer the decoration
to the wall, is to make a overlay drawing, a so called calque, on a piece
of paper, from which it is possible to scratch or trace the contours of
the ornament with a metal pin, through the paper.
After this the composition are scratched
in the wet mortar with a special iron, held perpendicular on the surface,
but this time making an even and square groove, 2-3 millimetres in
the surface.
Still while the mortar is wet -
that means during the same day, the groove is filled carefully with a specially
prepared coloured air lime mortar, quite "dry" in the consistency, but
applied "wet-in-wet". The mortar must be prepared of wet slaked air lime
and very fine sand (0-4 mm) 1:3. The tool for this work is a spatula or
a palette knife.
After filling the groove with coloured
mortar, the surplus mortar is cut away with a knife, so the surface is
exactly at the same level as the plaster-surface. The surface is furthermore
smoothed and straightened with a spatula.
Making sgrafitto decorations
Sgrafitto means scratching or scraping
in Italian - and that is what the process is about. In sgrafitto the hardened
but well pre-watered second layer of rough plaster surface is applied a
2 cm thick layer of a strongly dark coloured lime mortar. The colours can
be charcoal or lampblack, used directly as filler-material in the 1:3 air
lime mortar.
When this layer, which is smoothened
with a wooden float, is still wet, a new 3-8 millimetres thick layer of
white of bright coloured air lime mortar. The pigments can be ground chalk,
whiting or zinc-dioxide. The sand and the chalk has to be delicately fine
grained, to ensure that the surface can be glazed very smooth and even.
Again the geometry or composition
of the decoration can be transferred to the still wet surface by free hand,
with a ponse-drawing, or with a calque.
Still while the mortar is wet, all
the edges of the figure are cut free with a knife or a spatula. It is important,
that the cutting edge forms an oblique angle, both to obtain the sharpest
possible outlines and to keep the rain water from intruding the mortar
layers. After this the rest of the mortar between the lines are scratched
away with special tools.
By this process the dark/black under-mortar
is detached and visible as black/dark drawings or figures in the white
surface-layer.
More advanced sgrafitto-decorations
can be made of up till 4-5 thin layers of mortar in various colours, but
the main technique is made of one dark and one light layer.
Making al fresco plaster decorations
The last decoration technique on
flat plaster to be mentioned here is al fresco plaster. Again the name
is Italian and means "In the fresh (wet) mortar". Even on exterior facades,
al fresco decorations has a quite good durability, but will often be placed
under a large eaves or half roof.
The construction of the ground for
the al fresco are made as described under flat plaster (Drawing no. 5).
But instead of three layers, the ground is built up with 5 to 6 very thin
layers (3-4 millimetres), with finer and finer sand - ending with fine
grained marble dust in the last layer. In this decoration technique the
layers must not carbonate, but on the contrary has to be applied ìwet-in-wetî,
in one continuous process. To prevent shrinkage cracks, the layers are
beaten hard with a wooden board or the like, to make the plaster as tight
and firm as possible. Even though it is necessary to scratch the surface
slightly with a comb, before applying the next layer, to improve the binding.
The colours for the mural paintings
are made of lime water, mixed with fast pigments and stored for 24 hours,
to be totally soaked.
Again the figure or geometry of
the decoration has to be drawn on the wall or transferred very qiuckly
to the finishing coat of very fine mortar, with a ponse or a calque, and
then, continuously at this point, the fresco painting is made as quick
as possible on the still wet mortar. Here no mistakes or regrets are allowed,
as the lime colours intrudes into the mortar surface and fix immediately.
It is only possible to make a painting
as large as the prepared mortar ground - a so called "day's work", but
on the other hand, it is not possible to continue the next day on the "old"
mortar layers from the day before. They have to be pulled down and new
ones constructed again all from the very start.
Index
|
