Working
Techniques and Repair Methods for Plaster Decorations on Facades
By: Søren Vadstrup
5. Sunken batten
decorations in plaster on facades
Stucco, ashlar and imitated/artificial
stone on facades can be made in several ways, but the sunken b atten technique,
which is described here, is definitely the masons work, while the technique
of making ashlar with running moulds is mainly carried out by the stucco
workers - sometimes by the masons.
Sunken batten decorations is made
of specially formed battens, which make an imprint in the wet mortar, and
by this, when the battens are removed again, imitating pointings or forming
edges of natural stone work.
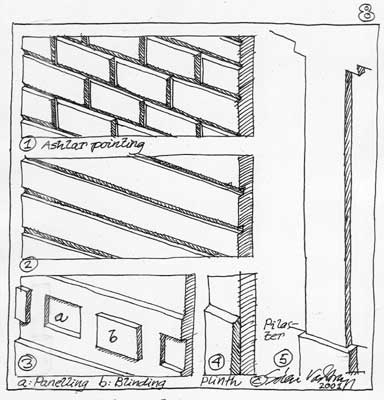
Drawing no.8 shows the different
varieties of relief imprint decorations. Most common are ashlar decorations,
but also other possibilities are indicated. Ashlar can have various appearances,
as shown on drawing no.11, both regarding the relief in the pointing grooves
and the character and structure of the surface.
Tools and utensils
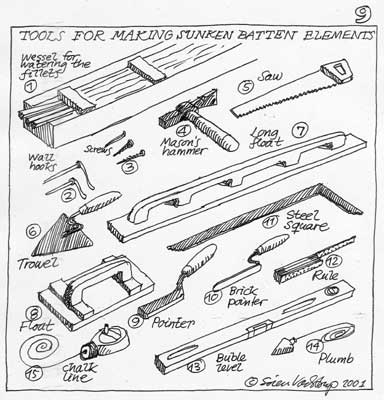
The various tools, both for carrying
out the ashlars and for the surface treatment, are shown on drawings no.
9 and 10.
Materials
The materials are hydraulic lime
mortar and on buildings after 1860 often Portland cement mortar. To day
we recommend hydraulic lime mortar (1:2:9) both for making new ashlars
and for the repair of old decorations, because the old remaining cement
materials are now so weakened that insertions with new, modern cement mortar
will cause problems.
Making sunken batten decorations

The backing coat for the sunken batten
plaster decoration has to be 2 layers of rough mortar, thrown on well watered
masonry, smoothened and after this hardened for 2-3 days or a whole week.
A lot of battens are planed to obtain
the right shape for the revers imprint of the pointing grooves. After this
the fillets are soaked, totally sunken in water for a couple of days. The
shrinkage of the wooden battens after the hardening of the mortar and the
drying of the wood makes it possible to remove the battens again without
spoiling the edges of the pointings. Besides this the battens must have
a conical and chamfer shape.
When the backing is ready, the battens
are placed and fixed to the facade, in the wished pattern (Drawing no.
10). After a thorough watering of the backing coat, a layer of rough hydraulic
lime mortar is thrown on the surface and smoothened, approximately 1 cm
under the outer level of the battens.
After a weeks hardening the ground
is thoroughly watered and a finishing layer of fine grained (0-4 mm sand)
hydraulic lime mortar is thrown on. Now the surface is smoothened and glazed
very carefully, to the same level as the outer level of the battens.
While the mortar still is wet, and
the battens still at its place, the desired surface structure is carried
out, except the stone carved surface (no. 5).
After a weeks hardening the wooden
skeleton is removed very carefully, in order not to destroy the edges of
the pointing profiles. The screw holes, possible missing parts or air holes
are repaired immediately, if necessary with special shaped jointer.
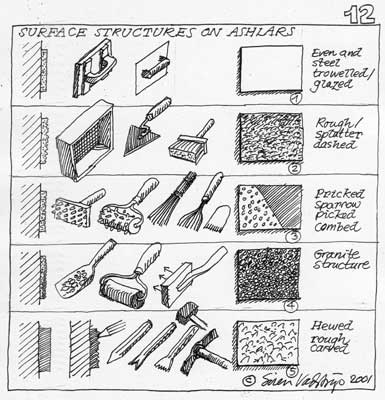
Surfaces structures on ashlars

1 Glazed or polished surfaces are
made by a smooth wooden float and a metal board
2 Splatter dashed surfaces are made
of a relatively rough lime mortar, thrown on the surface through a rough
sieve. In order to appear as natural as possible, the mortar ought not
be adjusted after the application.
3 Sparrow picked or combed/brushed
surfaces are made with special tools as shown at the drawing, while the
surface mortar is still wet. The comb or besom is often draw slantingly.
4 Granite gravel surfaces are made
of selected granite gravel, either rough cut and sharp rubble or small
round gravel, which is thrown at the wet mortar or pressed or pushed in
place. To fix the gravel, it is furthermore pressed in the ground by a
roll or a wooden beater.
5 Rough carved surfaces are made
by leaving the surface 2-3 cm higher than normal. After one week of hardening
the surface is carved with stone carving tools: Flat chisel, tooth chisel,
point chisel, flat hoe and tooth hoe, for different surfaces.
Lintel-constructions
The lintel-constructions is an important
element of ashlar decorations on facades in connection with holes for windows
and doors. The lintel can be horizontal or curved/bowed.
In the first place it is important
that the horizontal lintels are not made totally straight, but constructed
with a very small bow upwards, only 1 cm, because if not, they will seem
to be "hanging".
Secondly, when imitating stone work,
it is necessary to think and to "copy" how a stone mason would construct
the same detail in real stone. To be able to receive the pressure from
he load, the corner stones are cut without sharp edges, which tend to break
off. Therefore the upper edge of the window- and door holes are often raised
or lowered approximately 5 cm in proportion to the horizontal joints -
to prevent sharp and therefore weak edges at the particularly loaded bedding
stones in the upper corners.
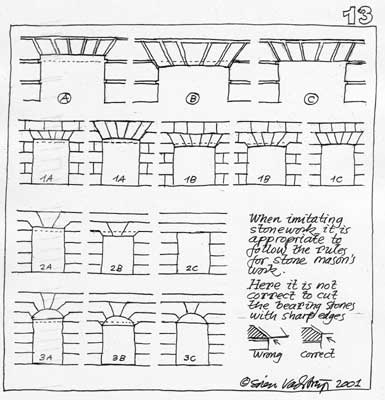
This gives some varieties in the
design, depending of the hight of the lintel stones as shown on drawing
no. 13.
If an existing ashlar does not have
these details, it must not be changed, but kept exactly as it is now. Many
lintels on existing old buildings are made in level with the horizontal
joints. But the right way to construct this detail is to imitate, not only
the external likeness, but also the stonemasons craftsmanship and natural
and functional constructions.
Index
|
