Working
Techniques and Repair Methods for Plaster Decorations on Facades
By: Søren Vadstrup
10. Repair on plaster surfaces
and plaster decorations on facades
The deterioration and damages
on facades
Insufficient understanding for and
neglect of the gradual deterioration and damages on the facades are the
causes of long term destruction or even loss of many historic buildings.
Visible damages
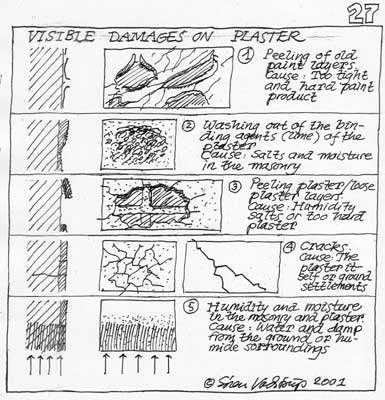
Some of the damages are immediate
visible on the surface. For instance (Drawing no. 27):
1 Peeling paint layers
2 Leaching of the bonding
agents of the plaster
3 Peeling of layers of plaster
4 Small and larger cracks
5 Humid, moist or wet plaster
from ground humidity
Causes of the damages
Most of the deterioration and damages
has 5 causes:
1 Influence of water - and
the consequences or followers of water: Moisture, ice, saltwater, acid
rain. This causes dry rot and fungus in wood, salts in masonry and stones,
frost damages, acid deterioration, algae, dirt etc.
2 Mechanical causes - from
wear, ground decreases, insufficient carrying capacity and wind.
3 Technical faults - from
insufficient constructions: Leakages, insufficient adjoints between materials,
too hard and moisture tight surface treatments or finishing coats, changes
in the physical balance in the constructions.
4 Forced deterioration of
the surface materials due to leakages in the roof, joints, watertight surface
on iron etc.
5 Other causes - incorrect
use and arrangements, neglect of maintenance.
Technical survey on the masonry
But before the restoration of the
facade, the masonry must be examined more closely. This should be executed
preferably by an impartial authority, and not by the craft firm intended
to be involved in the actual work. One or more of the following circumstances
must be inspected depending on the type of construction:
1 Did any constructive circumstances
lead to damages on the masonry like soilage on the facades? Are there constructions
that should be altered?
2. Are the flashings, trims,
gutters and leaders in order?
3. Is the masonry discoloured
and is it necessary to clean it?
If so, an experimental cleaning
must be executed well in advance of the renovation to find the suitable
method of cleaning, for instance by water jetting etc.
The most considerate method towards
both masonry and environment should be chosen.
4. Is the masonry coated with
an impermeable paint layer that has provoked the damages on the masonry?
If so, the paint-layer must be removed
and replaced by a moisture penetrable type of paint.
5. Is a moisture insulating
layer induced in the footing, or is there any other obstacle for the soil
dampness to enter the masonry?
6. Are there smaller or larger cracks
in the masonry or the plaster?
7. Are there cracks or gaps in the
masonry, where water can enter? For instance in connection with mounted
cast decorations, balconies, staircases, iron rails, iron anchors, wooden
windows or doors, half-timbering, natural stone etc. If so, this can be
dangerous for the facade.
8. Are there evidence of corroded
iron anchors, deeper in the masonry.
9. Is the plaster deteriorating,
peeling, flaking, constantly wet or dose it look "rotten"? If so, there
are probably absorbed salts in the masonry. The plaster must be removed
totally and the causes for the salts, ascending ground-moisture, salt storing
in the building, thaw-salting of the pavement etc. must be removed or reduced
and the salts drawn out of the masonry by packages of distilled water or
a sacrificed layer of lime mortar. A new layer of lime mortar, constructed
as two layers of increasing fineness, is added. These parts of the masonry
cannot be surface-treated with lime wash or paint before all salts are
removed.
10. What design/mixture has the
existing plaster? The plaster repair must always have exactly the same
design/mixture to ensure the same strength, elasticity, sough-ability -
plus colour and grain-structure.
Plastic paint on facades
Frost-bursted joints and tiling
often occur on lime washed facades successively coated with plastic emulsion
paints, cement-based paints or modern silicone paints. Particularly old
houses built with hand moulded bricks jointed with lime mortar are in the
danger zone.
The cause of the damages is often
due to the fact that the new materials used for surface treatment are much
too impermeable which lead to a diminution of the transmission of the natural
humidity and vapour. The humidity is accumulated behind the surfaces from
which it slowly evaporates and crystals will deposit and keep growing.
This is shown by experience and
it is documented by the so-called PAM numbers (value given for pressure
against moisture). The PAM-values of the above mentioned materials are
as follows:
Lime wash:
0,0 - 0,4
Paints based on cement powder
0,8 - 1,0
Plastic emulsion paints
2,0 - 7,0
These numbers emphasize that lime
is the material with the highest diffusion without doubt. The importance
of the open lime surfaces compared for instance to the more impermeable
materials is revealed by all the damages that occurred during the last
few years in connection with the new treatments. Well-harden lime
mortar is furthermore deteriorating if it is inclosed by a material with
a high PAM-figure.
Other damages are provoked by the
water that penetrates from the outside through fine cracks and accumulate
behind the impermeable surface-treatment and does not have the possibility
to evaporate quickly through the dense surface coating. The accumulation
of water in the masonry leads to crystallisations and frost damages during
winter which manifest itself as bursts of joints and formation of stone.
Cleaning for plastic paints etc.
The cleaning of masonry previously
treated with plastic emulsion paints or materials based on cement must
be done down to the firm ground.
Cleaning is done with low-pressure
jetting, where it is possible. The work must be executed with great care
in order not to damage the masonry additionally by admitting to much water.
A possible mixture of sand and a successive water jetting should not be
too hard as it will damage the fire coating of the tiles. In that case
the surface of the bricks will be damaged and consequently they will
absorb much more humidity than before. It is recommended that experiments
are made in every single instance until the correct method is found.
Building parts, windows, doors,
cornices etc. that are not to be cleaned must be covered properly before
the treatment is initiated.
Assessment of cracks
The crackings may appear both in
an early state after the coating of facings, which is the most frequent
situation, or it may appear much later, many years after the finishing
of the building.
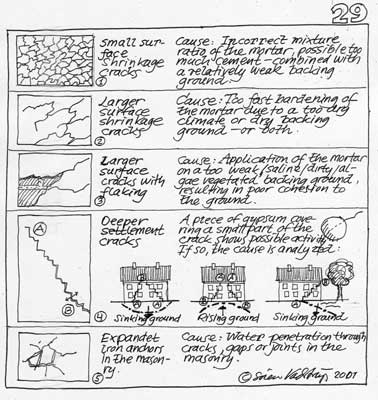
The crackings on plaster can, as
shown on Drawing no. 29 be grouped in:
A: Surface crackings
B: Deeper crackings
or slots
Surface crackings
Surface crackings do not overcome
the thicknes of the single or multiple layers. In general they do not follow
a specific direction. They may appear in any direction and they often give
origin to closed cracking lines, such as large cells with big or small
dimensions.
Surface crackings is generally due
to wrong application of the coatings.
1 The use of mortars with unsuitable
composition or mixture will cause crackings as shown in picture no. 1.
2 The application of mortars on
too dry or hot surfaces causes too quick stiffening and the consequent
laminar retraction, shown in picture no. 2
3 The application of renderings
on dirty surfaces with any kind of fungi, powver, or under some active
chemical decomposition, give orign to a kind of cracking followed by detachment,
as seen on picture no. 3.
Deep crackings
Deep crackings attain deeper in
the walls, overpassing the coating and attaining as well the composing
elements of the wall supports, bricks, stone blocks, hydraulic binding
and reinforced concrete.
Deep crackings also differ from
others for their specific direction and location of specific points of
the building architecture, as seen on picture no. 4.
Deep crackings are generally due
to structural movements, mostly downwards, in the foundations of the facade.
The deep crackings and the surface
crackings may have the same apperance when they are not coincident at the
surface of the rough wall and in the coating. This happens when the wall
detaches itself from the coating.
Another type of deep cracings is
due to the expansion of corroded iron anchors, situated deeper in the masonry.
Picture no. 5.
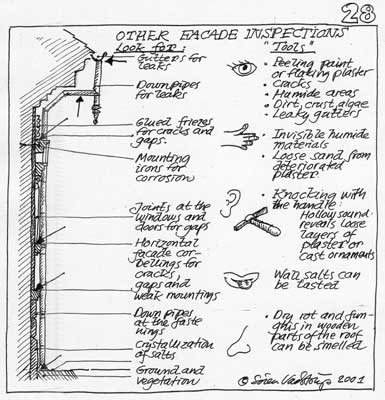
Examination
The method of examining the conditions
of a cracked plaster/rendering is by knocking/percussion on the surface
with a wooden shaft/handle of a hammer.
- a clear and open sound indicates
adhesion of the plaster to the support
- a hollow and deep sound indicates
detachment from the support
Repair of cracks
If the following conditions occur
in a new rendering, it will be sufficient to fill up the crackings with
a thin past of the binder, used in the rendering:
- the affected area is limited
- the crackings are small
- the dimensional stability has
been checked
- a finishing layer, limewash
or painting is to be applied.
If the affected area is wider or
if the crackings overpass 2 mm, the new rendering should be taken of and
a new layer applied, with the right composition or mixture and the right
construction.
Graphic diagnose sheet of the
deterioration and damages
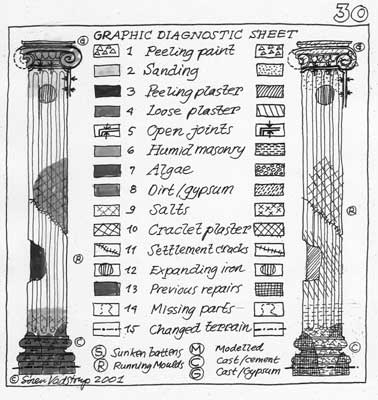
In order to produce a documentation
of the technical state of the facade, and at the same time get an overview,
it is recommended to work out a Graphic diagnose sheet, as shown at Drawing
no. 30.
She sheet can be made with colours
or with graphic symbols, covering the most common types of damages on plaster
on facades.
Photoserie III: Damages on plaster
decorations:
A Flaking of plaster layers
B Detail of flaking
C Gaps in joints between cement
elements
Historic research on the masonry
Besides these technical examinations
of the masonry it will be relevant to investigate the history of the facade,
that is the previous colours, previous repairs, previous alterations previous
plaster coats - or other surface-treatments.
The sources for this can be written
documents or records in archives, old drawings, paintings or photographs,
but primary, careful investigations and observations on the facade of traces
of colours etc.
Restoration attitudes
1 First of all, the original parts
of the building must be preserved and protected by restoring the building
as carefully as possible. Repair should be preferred to replacement.
2 The maintenance and restoration
of the building must be carried out with the same traditional materials
and crafts techniques that were used when the building was originally built
3 We must have a thorough understanding
of the materials and constructions, regarding both the weak and the strong
points, in relations to what is required of them. Therefore the restoration
work must be carried out by multi-dicipli-nary ex-per-tise and specially
trained and experienced craft skills.
4 It is important, through the repair-
and restoration work to keep up or improve the architectural entirety of
the facade.
5 When a restoration implicates
severe alterations a brief and concise docu-mentation is required including
for instance descriptions, photos, drawings etc., in case information about
the constructions one day should be needed. The documentation must be available
in a public archive.
The traditional building- and
crafts techniques
The traditional building- and crafts
techniques involve a number of carefully prepared preventive elements to
avoid these life-threatening damages of the buildings. They represent a
kind of natural physical balance, which will be destroyed and causes more
damages, if unconsidered changes are being made.
The traditional building constructions
have 5 preventive elements, which will diminish the chances and cause later
damages:
1 Quality-improvement of
the materials and micro-constructions by the crafts-techniques. Examples:
Hand-wrought iron, quartersawn wood, waterlogged wood, mixing and application
of lime mortar, mixing and application of paint, etc.
2 3-double protection of
critical constructions and elements. Examples: The joint between window
and masonry, the construction of the wooden windows, rust protection of
iron, the tile roof, the plinth/socket-construction, the building of wooden
balks in masonry etc.
3 Sacrificial layers: On
very critical points, the traditional constructions operate with sacrificial
layers or elements, which are easier to change or repair than the vital
elements. Examples: The plinth-mortar, the mortar-joint on windows, the
linseed oil putty on windows, the traditional paints on exterior wood,
the horizontal bottom- or top boards in wooden constructions, etc.
4 Maintenance-signals: The
traditional materials and constructions send out distinct ìmaintenance-signalsî,
when they need to be maintained. Examples: Linseed oil paint and other
traditional paints, lime wash, tile roofs, windows, exterior wooden boards
etc. It is very important to know these distinct "signals" and to read
them right. Uninformed people often interprete these as serious damages,
needing to be renewed - and not just maintained.
5 Repairable elements: The
traditional materials and constructions are ìrepairableî, which is a very
important quality. If something happens, you can repair parts or whole
elements. This gives these elements, for instance wooden windows, a life-long
durability. There are thousands of examples of wooden windows lasting more
than 200 years - and still in an excellent state of preservation!
There is a lot of examples of how
more knowledge and awareness of these 5 important, but often forgotten
qualities of the traditional building materials, building constructions
and crafts techniques could save both the house-owners and the different
countries quite a lot of money.
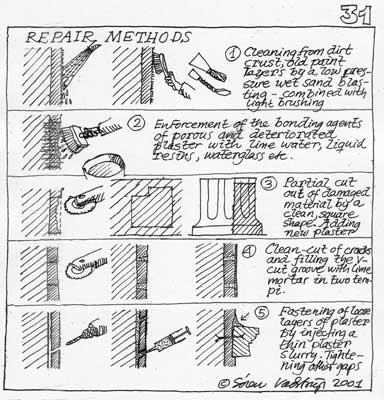
Repair methods
After a cleaning has taken place
at the facade a repair of defective and frost bursted bricks has to be
executed: Defective stones are cut out and new hand moulded or sandfaced
tiles are bricked in which lead to the best adherence to the following
lime wash. Frost bursted joints are scraped out until firm mortar, min.
3 - 4 cm, and a new joint filler is applied.
Any parts with loose plaster, cracks
etc, are cut of. Plaster or mortar joints repaired with cement or mortars
containing cement must also be cut out and replaced by lime mortar, as
the lime does not adhere sufficiently to cement-based surfaces.
The surface of cement-based mortar
is tight sheets of silicates absorbing humidity behind the surface and
a humidity absorption that slowly evaporates. The more open lime mortars
quickly gives off the moisture again. Lime washed surfaces on which repairs
are made with cement mortar will appear very stained in damp weather. Cuttings
up to the existing original, but appropriate plaster shall always be made
with right lines and right angled corners.
After a cutting out of bricks and
joints down to a firm ground the masonry is carefully cleaned of remains
from the mortar, dust etc. and water is sprinkled on until the surface
is saturated as much as the bricks and joints will be able to absorb a
little of the mortar water. The joints are completely filled and a backfill
may be necessary too and eventually all joints are compressed with a brick
jointer.
Technical principles for plaster
repair
When carrying out repairs on existing
plaster on masonry or making a new layer of plaster on old buildings, there
are 5 main principles, which have to be followed:
1 All repairs on existing plaster
on masonry or new coats of plaster should use an air-lime-mortar, without
hydraulic additives or cement, or, on certain extreme positions,
a slightly hydraulic mortar. This goes also for repairs of old cement-plaster.
2 The plaster shall be an exact
copy of the existing plaster, regarding roughness, colour, surface-character,
traces of the tools etc. The mason has to make a sample for a critical
comparison, before the whole work is started. Certain research-institutes
can analyse the old plaster and determine the type of the binding agents,
the sand and other additives.
3 Before adding new plaster, the
masonry has to be cleaned of dust, dirt and detached parts by brushing
and subsequently the surface is watered carefully with plain tap-water.
4 Layers of plaster shall be carried
out in three coatings or layers:
A: A rough but thin ground
layer of air lime mortar 1:3 (or hydraulic lime-mortar 2:1:9, 1:1:6 or
1:2:9 - depending of the deterioration, weak- or hardness of the background
masonry) with quite rough gravel, thrown on the masonry, and left fairly
uneven.
B: After hardening: a 2-3 cm second
backing coat with coarse gravel, thrown on and then drawn to an even layer,
and after that allowed to harden for one week.
C: Then followed by a very fine
finishing layer/coat with fine grained sand, also thrown up and drawn to
an even coating.
The thickness of the layers must not
be superior to 2 cm, as thicker layers will cause thermal differences and
internal pressure between the interior areas and the area more exposed
to the weather conditions, where the water evaporation and the quick cooling
of the mortar occurs. This favours the retraction effect with inevitable
uprising of crackings.
5 A good and lasting result implies
previous, appropriate interventions against structural settings in the
masonry, ascending ground moisture or hygroscopic salts.
Demands for weather and temperature
Mortar-repairs must under ideal
circumstances take place during a relatively humidity in the air at 75-95
%. The temperature should be minimum +5 Celsius and maximum +18-20 Celsius.
A total absence of wind is also recommendable.
Materials
See chapter
2
Index
|
