Working
Techniques and Repair Methods for Plaster Decorations on Facades
By: Søren Vadstrup
6. Running mould decorations
in plaster on facades
The main cornices, the architrave
and horizontal friezes, the window- and door casings and possible half
columns are typically made by running mould. But also ashlars can be constructed
this way.

Materials
Running mould decorations on facades
are constructed of air lime mortar or hydraulic lime mortar. After 1860
also Portland cement mortar is used.
To day we recommend the use of air
lime mortar (1:3) or hydraulic lime mortar (1:1:6 or 2:1:9) both for making
new Running mould decorations and for the repair of old decorations, even
if they are originally made of cement. The old remaining cement materials
are right now so weakened that insertions with new, modern cement mortar
is not appropriate.
Tools and utensils
Running mould are made by a sheet
zinc mould, mounted on a wooden sledge, which is able to ýRunningţ or glide
along the facade, via horizontal or vertical rails and guides, fixed to
the facade. Furthermore special trowels and boards are necessary.
Making Running mould main cornices
and friezes
At first it is necessary to make
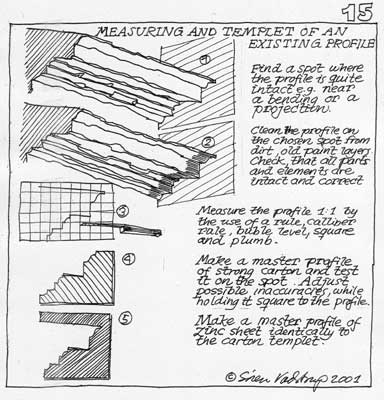
an exact drawing 1:1 of the profile or mould of the cornice or frieze.
If an existing cornice is repaired or replaced, the old and original profile
must be painstakingly measured and recorded - on a place, where the profile
is most best preserved and correct.
To verify the exact shape, a accurate
templet is made in paperboard, and tested and corrected at the spot.
Note that the main cornice are often made with a little oblique drip (under
carved) internally, to prevent water drops from "hanging". This must be
carefully copied.
It is on the other hand quite important,
that the running mould decorations, especially the main cornices, have
good proportions, so in glaring cases, it is allowed to improve the shape.
The next step is to make a accurate
sheet zinc mould of the same shape as the cardboard templet. After this
a 1 cm smaller sheet zinc mould is made for the first, muffle running mould.
Both sheet zinc moulds are nailed to a piece of board or plywood, cut out
2-3 mm smaller than the sheet zinc mould, and provided with a chamfer towards
the profile.
The wooden piece with the sheet
zinc mould is now firmly mounted to a wooden sledge with a special lock
wedge and two shore lists, fixed with screws.

Now two wooden rules are mounted
at the masonry, following the future lines of the cornice, frieze or casing,
at the facade, and adjusted in proportion to the right height and course
of the running mould sledge. As the mortar layer must not be more than
5 - 6 cm thick, all larger running mould decorations must have adequate
corbellings of bricks or stone in the masonry. Therefor it is necessary
to test the running mould sledge at the spot, in order to ensure, that
the applied mortar layer everywhere will be between 3 - 5 cm thick
After plentiful pre-watering of
the backing, coarse hydraulic mortar is thrown on, and the small sized
reverse running mould drawn with the slanting edge pointing backwards.
This is done several times, until the shape is complete, according to the
small mould. If the surface is very smooth, it will be necessary to scratch
small grooves in it.
After 2 - 3 days of hardening, preferably
more, we are ready for the finishing coat. The mortar for this must be
made with air lime, wet slaked for at least 3 years, mixed with very fine
sand (0-4 mm), in proportion 1:3. Mixing time: 20 minutes.
The ground is pre-watered and the
fine grained mortar thrown on and treated with the larger reverse running
mould mounted at the sledge. When the shape is completed, a finish coat
is applied, mixed in the proportion, lime sand 1:2, while at the same time,
the running mould is drawn the opposite way - with the slanting edge
pointing forward. This creates a particular hard, smooth and weatherproof
surface.
Photoserie I: Making running mould
friezes
A Setting
up the wooden roles on the masonry
B Testing
the reverse zinc mould for the space for the corbellings
C Coarse
mortar is thrown on
D The
running mould scrapes surplus mortar off
E Fine
mortar is thrown on
F The
running mould scrapes surplus mortar off and smoothens the surface
G Detail
of the running mould
H Detail
of the running mould
I Detail
of the running mould
It will often be necessary to make
the last 10 cm at the end of the running mould decoration ýby handţ, as
the sledge has only a certain length. This is done with a collection of
special wooden floats - never with a sponge, as this will damage the edges
and spoil the lines.
The reason why the running mould
decorations are made in two separate operations - with two sheet zinc reverse
moulds of different size, is to prevent the small shrinking cracks in the
surface, which inevitably will occur if thicker layer of mortar is applied
continuously "wet-in-wet". By laying a relatively thin finishing
coat on a thicker, but hardened ground layer, the shrinking cracks in this
will be filled, covered and minimized. As these cracks, even if they are
quite small, often causes increased deterioration and approaching damages,
especially on decorations exposed to rain, this more complicated
procedure is absolute worth while.
Running mould decorations are sometimes
pre-fabricated at the workshop, cut in suitable elements, transported to
the building site and mounted here like the cast decorations.
Making curved running mould decorations
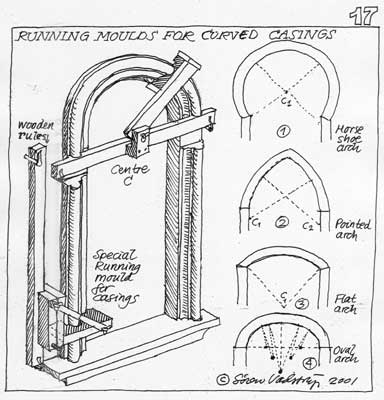
Door- and window casings are sometimes
curved, which is also possible to make with the running mould technique
as shown on drawing no. 17.
The straight parts are made with
a smaller running mould sledge, thus enabling the mould better to reach
the often sharp bottoms. To make the curved parts, the sledge is mounted
on a special board, fastened at the constructed centre for the curve, arch
or chord - sometimes more than one centre is necessary. The centre point
is fixed with special arrangements.
Another method is to set up specially
curved rules - and draw the running mould along these. They can describe
any possible curved form.
Other curved ornaments on facades
made by running moulds
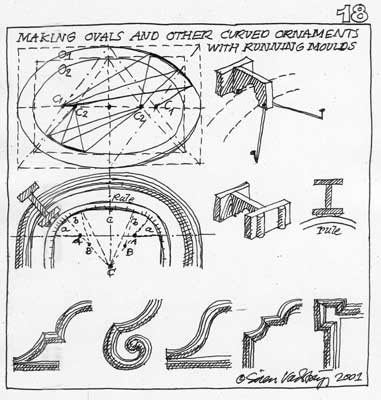
A lot of other curved ornaments on
facades could be made with the running mould technique, using various types
of running moulds: elliptical, oval, convex-concave, cornice-shaped etc.
Very often these decorations are made by running moulds at the workshop
and, after the hardening, mounted at the facade in suitable pieces, but
they could also be made in situ.
The methods are either with strings
or curved rules - combined with specially designed running moulds in each
case - followed by hand modelling with special floats and trowels.
Making running mould stucco and
ashlar
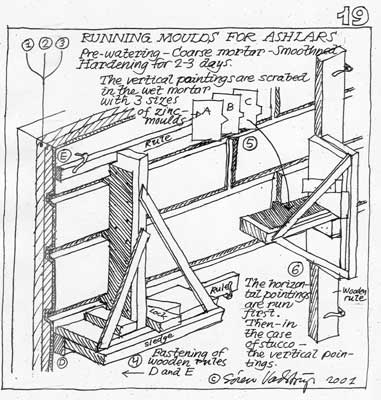
As mentioned above, artificial stone
walls and ashlars are often carried out with a running mould technique,
as shown on drawing no. 19. Here it is only necessary to fabricate one
sheet zinc reverse mould, as the running mould and the sledge can be "moved
outwards" in two tempi. This has the purpose to construct the plaster decoration
in 2 various layers of mortar, a rough ground layer, which has hardened
before the second, fine grained finishing layer.
The running mould process starts
with the executing of horizontal pointing grooves. The vertical traces
are drawn afterwards in the still wet mortar. The vertical pointings are
scraped in the mortar, which can be done partly with a scraper, partly
with the reverse running mould, in 2-3 variuos shepes.
The same procedure is followed for
the finishing layer of mortar. Apart from this all the measures and guidelines
described above under running mould have to be followed.
Photoserie II: Making running
mould ashlar
A The
wooden rules are placed on the masonry
B Coarse
mortar is thrown on
C The
running mould scrapes off superfluous mortar
D The
last coat is finished
E The
surface character is made
Making vertical running/turning
mould for columns
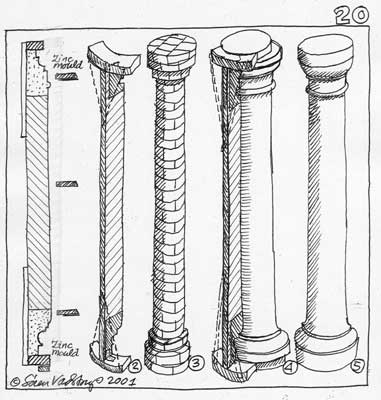
It is also possible to fabricate
a plaster column or a half column in the running mould - here vertical
turn mould - technique.
The column is constructed in masonry,
including the necessary corbellings, leaving approximately 4 - 5 cm to
a finishing coat of plaster - constructed of two layers of hydraulic lime
mortar. As the turning mould can be moved outwards, by adjusting the slide
pieces, there is no need for two different mould sizes to obtain the previously
described two coat construction of the plaster.
Index
|

